How to take a photo for facial analysis
Camera height, distance, light and expression decide whether the result describes your face or your lighting. Three minutes of setup is the difference.
Lens at eye level, arm's length or further, flat light from in front, neutral expression with the mouth closed, head level. Then a true 90 degree side profile in the same conditions.
Every measurement any face tool produces is a measurement of the photo. Get the photo wrong and the analysis is not wrong so much as answering a different question, and it will answer it confidently, which is worse.
The five things that matter
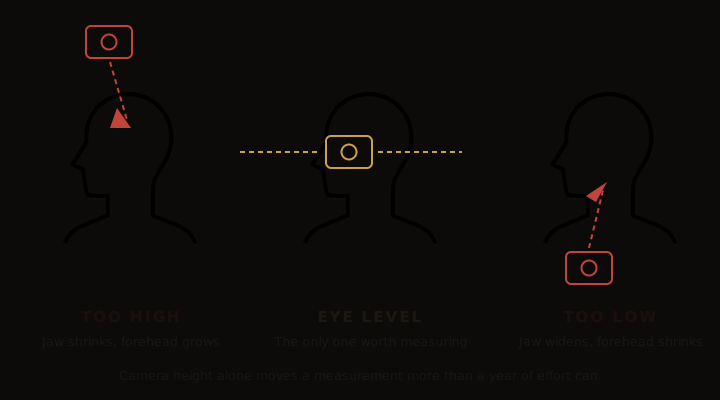
1. Lens at eye level
The single biggest error, and the one almost everybody makes, because a phone held naturally sits above eye level. From up there the forehead lengthens, the jaw narrows and the outer eye corners tilt upward. From below, the jaw widens, the nostrils show and the midface shortens.
Prop the phone on something at eye height and use the timer. If you are holding it, hold it out and level rather than up.
2. Arm's length or further
Closer than roughly 50cm and the lens itself distorts you. Whatever is nearest the camera renders larger, which for a face means the nose grows and the ears shrink. This is lens geometry rather than your face, and it is why the same person looks different in a selfie and in a photo taken from across a room.
3. Flat, even, front on light
Stand facing a window in daylight, no direct sun. Overhead lighting is the enemy: it drops shadow into the eye sockets and under the cheekbones, and every tool will read those shadows as bone structure. It flatters, and then your next scan in different light disagrees with the first for no real reason.
4. Neutral expression, head level
Mouth closed, teeth together but not clenched, eyes open normally, no smile. A smile changes the eye area and the lower third at once, so a smiling photo cannot be compared to a neutral one.
For head level, check that both pupils sit on the same horizontal line. A slight tilt manufactures asymmetry that is not there and it is invisible to you while you are taking it.
5. A true side profile for the second photo
Ninety degrees, not the three quarter angle people default to because it is more flattering. Jaw angle, chin projection and the nose profile can only be read from a real profile, and a three quarter shot quietly hides the exact things the second photo exists to measure.
What to avoid
- Beauty filters and skin smoothing. Many phones apply these by default on the front camera. Any skin score you get afterwards belongs to the filter.
- Glasses, hats, hair over the forehead or face. They hide the hairline and the brow, which are two of the things being measured.
- Heavy makeup, if you want a baseline rather than a made up result. Neither is wrong, but keep it consistent between scans or the comparison is meaningless.
- Different time of day between scans. Facial fluid is highest in the morning. If you want to track change over weeks, always shoot at roughly the same hour.
If you want to track progress
The comparison is only worth anything if the conditions are identical, so pick a repeatable setup and keep it: same spot, same window, same time of day, same distance, phone propped at the same height. Take the first pair, and keep them.
Most disappointing before and after comparisons are not a failure of the routine. They are two photos taken in different light six weeks apart, and nobody can separate the change from the setup afterwards.
Common questions
- Should I smile in a face analysis photo?
- No. A smile lifts the cheeks into the lower lids, changes the apparent eye shape and shortens the lower third of the face. Neutral, mouth closed, is the only expression that compares between two photos.
- Why does my score change between photos?
- Usually camera height and lighting rather than your face. A phone held above eye level and lit from overhead can move a result by a whole band, which is why a comparison between two scans is only meaningful if both used the same setup.
- Is a selfie camera good enough?
- It works, but the rear camera is better. Front cameras are wider and closer, which exaggerates whatever is nearest the lens, usually the nose. Prop the phone at eye level and use the timer.
On Android? Get it on Google Play
Forma is a self improvement tool, not a medical or diagnostic service.
Related guides
- Canthal tiltThe measurement camera height fakes most easily.
- Facial thirds and fifthsHow to check your own proportions once the photo is right.
- Facial symmetryWhy a tilted head invents asymmetry that is not there.
- Face shapeThe measurement camera height distorts second most.
- Dark circles and under eye bagsOverhead light manufactures the shadow you are trying to judge.
- Why you look worse in photosWhy the mirror and the camera disagree, and which one is closer.
- Nose profileThe feature short camera distance distorts most.